Undies!


I think that we all know what kinds of stuff work for super-stiff nobles, (not to say that I won't cover that here,) but I am more interested, at the moment, in what would have been a little more workable for the average person. In my mind, "average" could mean anything from milking cow, scrubbing floors, and shoveling poo; to a Merchant's wife, who still likes to do some of her own shopping, and needs to be able to fit through narrow market stalls, and into cramped and fabulous little shops...
OK, I admit it: I am equally as interested in not needing my own 3 foot birth, while at faire. Have you ever compared the width of a standard ridgid hoop skirt to the width of a standard port-a-privy? The dimensions are much too close to equal, for my liking.
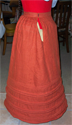
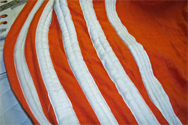
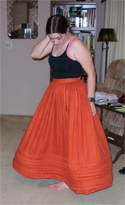
The orange beast, shown here is my first attempt at a corded, and padded petticoat. I sort of took a page from Missa and started out with a combination of hemp rope, and various widths of upholstry cord for the bottom of the petticoat, and some cotton quilt batting for the top. I wasn't really sure how everything was going to behave, so I started with a 125" skirt, which is about what I like for my plain petticoats. So I sewed a bunch of twill tape to the inside of the skirt, coaxed the cording through the channels, then sewed inbetween (or through) the multiple cords. Then I padded, and cartridge pleated most of the skirt to the back 3/5ths of the waistband, leaving a mostly flat front. By this time, the skirt was full of a ton of tailor's chalk, and I decided it should be washed. Incidentally, hemp rope shrinks significantly in the wash - lost an entire evening to splicing in another foot, or so, of rope, (preshrunk, this time...) All of that done, I finally sewed on hooks, and tried the petticoat on, only to discover that the hem wanted to be kidney-shaped, rather than round, or even oval. *sighs*
This resulted in me unpicking about 60% of the construction, and taking about 40" out of the width of the skirt, then putting it together again; this time, remembering to test fit the skirt before putting it on the waistband.
The final result is awsome, and very wearable. As it has gotten older, the batting has broken down, somewhat, and I may add a small pad, under the pleats in the center back to keep it from collapsing over my flat bum. I will do this again, and I have an idiot list, for when I do:
Pre-shrink all fabric, and stiffening, and stuffing seperately, before starting.
85"-90" is an ideal hem width for my build, (pattern 16-18.)
Add extra padding to the pleats in center back.
Add opposing pull loops to the waistband, to make hook closing simpler.
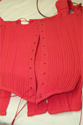
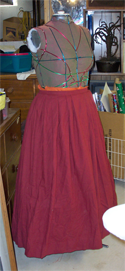
At the back end of the top bar, there is a picture of my first attempt at an effigy corset. It is entirely reed boned, and I really like the material, but have a caveat; It can snap, under extreme conditions. (I slipped, and rolled down a hill, at faire, snapping all the reeds in the left hand tabs.) My solution has been to put 1-2 flat steel bones down each tab, for safety. The reed I used was #3 round reed, and this corset had one reed per channel. This works fine, but leaves one looking rather corigated after wearing it for a while; In my new corset, I used 2-3 reeds per chanel, which minimized this, and did not significantly add to the weight, or bulk.